A website migration doesn't have to cost you traffic.
Permanent ranking drops and lost traffic aren't always caused by the migration itself. They're caused by preventable issues like missing redirects and undetected crawl blocks.
This website migration checklist walks you through every phase, from pre-migration planning to post-launch monitoring, so you can protect your rankings and recover quickly.
Here’s what we cover throughout our website migration checklist:
Pre-migration planning and preparation: Set goals, conduct a risk assessment, establish baseline analytics, audit your current site, and align your team before touching anything
Build and test: Spin up a staging environment, run technical audits, and validate that Google can crawl your new site before it goes live
URL mapping: Document every current URL, plan your redirects and removals, and update all internal links on the staging site
Completing the migration: Backup your content, update DNS settings, remove crawl blocks, enable redirects, update external links, and tie up loose ends in Google Search Console
Post-migration monitoring: Document your migration, track rankings, watch for indexing issues, troubleshoot any traffic drops before they compound, and cancel old hosting
What is website migration?
Website migration is the process of making major changes to a website’s technology, structure, design, or location, usually with the goal of improving the site’s user experience and SEO performance.
Some of the most common reasons to migrate a website include:
Moving to a new content management system (CMS) like WordPress or Wix. You might do this if you want to improve your site’s performance, security, or functionality.
Switching from HTTP to HTTPS to secure your site by encrypting visitors’ information. (Google highly recommends using HTTPs.)
Restructuring your site architecture to consolidate content, fix URL patterns, or improve navigation
Switching to a new host to try and speed up your site and give users a better on-site experience
Each migration type comes with unique technical requirements, so consider bringing in outside help for anything outside your expertise.
Does website migration affect SEO?
A proper website migration generally has a negative impact on SEO in the short term and a positive impact in the long term, as it takes time for search engines to understand the changes you’ve made to your site.
To minimize the negative impact on your SEO, follow our website migration checklist.
A detailed website migration checklist
Let’s go through the website migration process, including what you need to do before and after your migration.
Part 1: Pre-migration planning & preparation
Properly planning and preparing for your migration helps you retain rankings and avoid technical issues that could lead to traffic drops.
Let's walk through the essential planning steps.
1. Set clear migration goals and success metrics
Set clear migration goals and success metrics so you know what you want to achieve and how you’ll measure success.
Your goals might include:
Improving site speed by 30% or more
Increasing organic traffic by maintaining 95%+ of current rankings
Enhancing user experience to boost conversion rates by 15%
Strengthening site security with HTTPS implementation
Scaling infrastructure to support business growth
For each goal, establish specific key performance indicators (KPIs) like:
Traffic retention targets: A study from Search Engine Journal found it took sites around 17 months to regain their traffic. So, be realistic with your traffic retention targets as getting traffic back might take longer than expected.
Ranking preservation KPIs: Track high-value keywords and focus your efforts on retaining the keywords that bring the most value
Conversion rate benchmarks: Monitor form submissions, purchases, or other key actions
Technical performance metrics: Set targets for technical metrics like page load speed and Core Web Vitals scores (a collection of metrics showing how fast and usable your site is)
2. Establish baseline analytics
Establishing baseline analytics two to four weeks before your migration helps you understand your site’s current state so you know how the migration affected it (and what you may need to fix post-migration).
You can get analytics from tools like:
Google Search Console to review data like current keyword rankings, number of indexed pages, and Core Web Vitals reports
Semrush’s Position Tracking tool for a detailed view of keyword rankings, search visibility scores, and SERP feature ownership (Featured Snippets, People Also Ask boxes, etc.)
Google Analytics (GA4) for website metrics like organic traffic, conversion rates, engagement metrics, traffic sources, and more
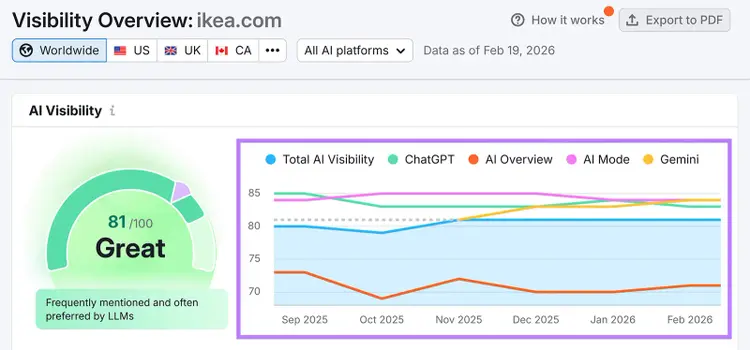
AI Visibility Toolkit for checking brand mentions, citations, and sentiment in LLMs like ChatGPT and Gemini
The more comprehensive your baseline data, the easier it'll be to identify issues post-migration.
3. Document your current site architecture
Documenting your current site architecture before migration ensures you can recreate your site on the new platform.
Your site architecture documentation should include:
URL structure patterns: How your URLs are organized (e.g., /blog/category/post-title/)
Content hierarchy: How pages relate to each other through internal linking
Navigation structure: Main menu, footer links, sidebar elements
Template types: Different page layouts used across your site
Third-party integrations: Tools, widgets, and services embedded on your site
For large sites with phased migrations, organize your documentation by priority level to determine which sections to migrate first.
4. Align stakeholders and create a realistic timeline
Aligning stakeholders and creating realistic timelines before migration prevents departmental conflicts, resource shortages, and rushed decisions that can damage your site's performance.
Key stakeholders typically include:
Executive leadership: Needs to understand risks, costs, and expected ROI
Marketing team: Concerned about traffic and lead generation impacts
Sales team: Worried about disruption to conversion funnels
Development team: Responsible for technical implementation
SEO specialists: Focused on preserving rankings and organic visibility
Content team: May need to update or optimize content during migration
Schedule a kickoff meeting to discuss elements like your timeline, goals, expected benefits, potential risks, and resources needed.
5. Conduct risk assessment and plan for rollback
Every migration carries risks. Identify potential problems before they happen.
Common migration risks include ranking losses (and traffic drops), broken site functionality, redirect errors, indexing issues, and drops in conversion rates.
For each risk, document:
Likelihood of occurrence (high, medium, low)
Potential impact on business goals
Prevention strategies
Detection methods (how you'll spot the issue)
Response plan (how you'll fix it quickly)
Tip
Create a rollback plan. If something goes wrong, you can quickly revert to your old site.
6. Audit your current site
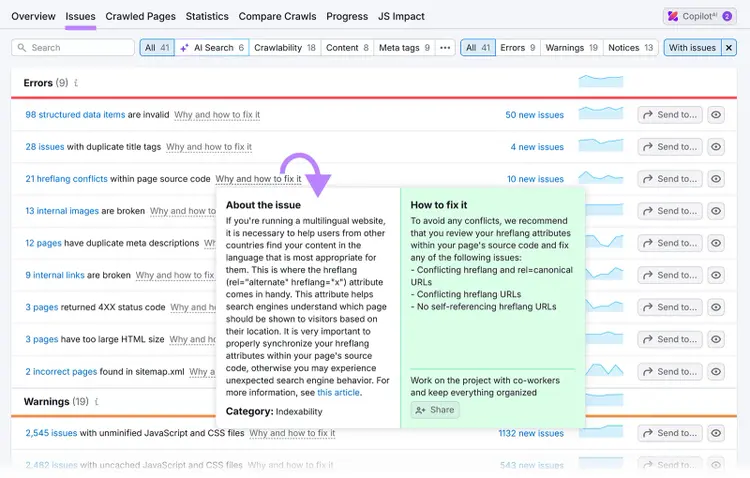
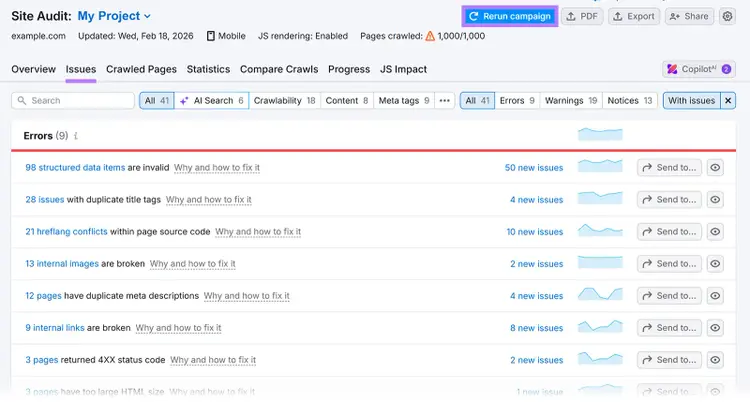
Running a Site Audit helps you identify issues and fix them before migration, so your new website works as intended.
Click into the “Issues” tab for a list of errors you should fix prior to your migration. You can click “Why and how to fix it” for tips on fixing each one.
Building and testing your new site in a staging environment lets you optimize content, fix technical issues, and validate functionality without risking your live site's performance.
7. Make a copy of your site
Making a copy of your site acts as a safe testing environment (also known as a development or staging environment) where you can apply changes without affecting your live site.
You should ask a developer for help, but the process typically involves:
Copying your website's files to a new subdomain (e.g., staging.example.com)
Duplicating your database and connecting this copy to the duplicated website files
Updating the configuration of the copied site to ensure it points to the new database and adjust any necessary settings (like URLs)
If your live website uses a content delivery network (CDN) (a collection of servers around the world that delivers content to users based on their location), make sure to set it up on your staging site, too. That way, you can ensure it works well alongside your new site.
8. Block access to your staging site
You need to block search engines from accessing your test site. Otherwise, it could appear in search results before it’s ready.
First, we recommend that you add password protection to keep both users and website crawlers out. Many hosting providers let you do this through the hosting control panel, and platforms like WordPress have plugins that can add password protection.
Then, add a noindex tag (a meta robots tag that tells crawlers not to include the page in search results) to every page on your staging site. Like this:
<meta name="robots" content="noindex">
Your noindex tag is temporary, and you’ll want to remove it prior to pushing your site live. Later on, we’ll show you how to run a test to ensure search engines can properly crawl your staging site prior to pushing it live.
9. Prepare the new site
Preparing your new site involves optimizing content and fixing longstanding SEO issues so your new site has a chance of ranking high in the search engine results pages (SERPs).
Think of migration as an opportunity, not just a technical necessity. You're already making major changes — why not improve your content and SEO at the same time?
Here are tips to optimize your site during the migration process:
Conduct a strategic content audit. Use Semrush's Organic Research tool to identify underperforming pages, decide whether to improve, consolidate, or delete low-value content, and find and fix duplicate content using Site Audit.
Fix on-page SEO elements. Optimize title tags (under 60 characters, include keywords), write compelling meta descriptions (150-160 characters), improve header tags (one H1, logical H2-H4 structure), and strengthen internal linking to important pages.
Optimize technical performance. Compress images and implement lazy loading, test mobile responsiveness, improve Core Web Vitals scores using Google PageSpeed Insights, and optimize loading speed.
Refresh outdated content. Update statistics, examples, and screenshots, add FAQ sections and recent case studies, and remove references to discontinued products or services.
Focus on pages that drive the most traffic and conversions first. Don't try to perfect everything — prioritize improvements that will have the biggest SEO and user experience impact.
10. Set up Google Analytics 4
Create a new GA4 property or data stream for your staging site and install the tracking code so you can start collecting data.
This lets you prepare the events (user interactions) you want to track and ensure data is collected properly so you don’t miss anything important once the site goes live.
11. Run a technical SEO audit on your staging site
Running a technical SEO audit on your staging site lets you fix potentially harmful errors before they’re migrated to your live environment.
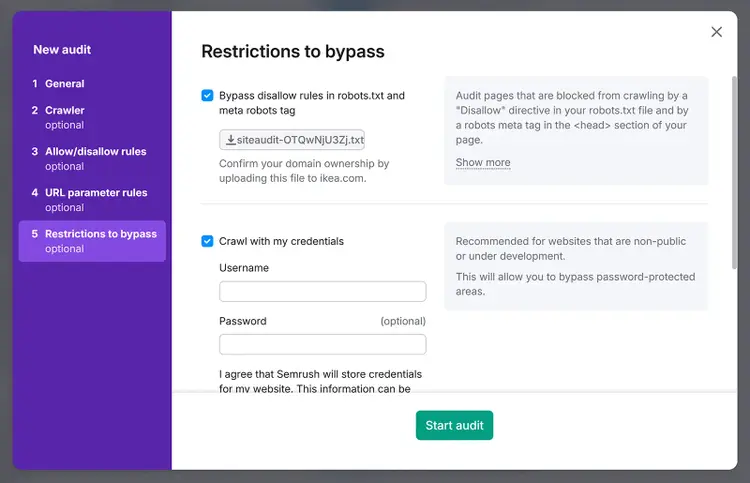
When setting up your Site Audit for your staging site, make sure to check the box next to “Bypass disallow in robots.txt and by robots meta tag” so that SemrushBot ignores your disallow directive and noindex tags.
When your audit is ready, take a look at your Site Health score to get a general sense of how your new site might perform.
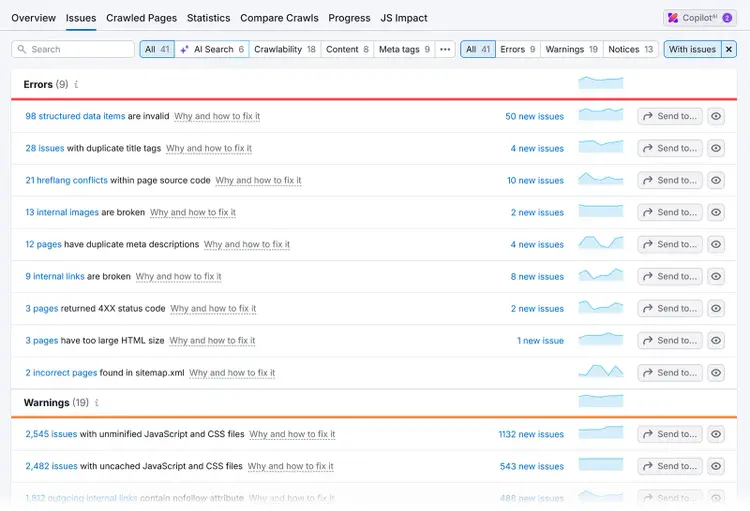
Then, focus on the “Errors.” These are severe issues that could seriously impact your SEO site migration.
It’s worth checking your “Warnings” and “Notices,” too. You can click through to view a complete list of issues with advice on how and why to fix them.
After implementing any fixes, rerun the audit to check that everything’s working correctly. You should see your overall Site Health score improve.
12. Give Googlebot temporary access to your staging site
Giving Google’s website crawler (Googlebot) temporary access to your staging site lets you confirm that Google can crawl and index the site properly.
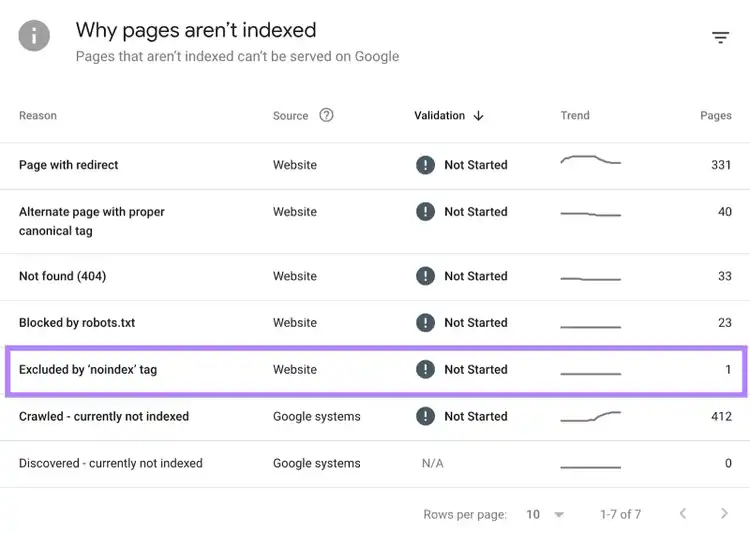
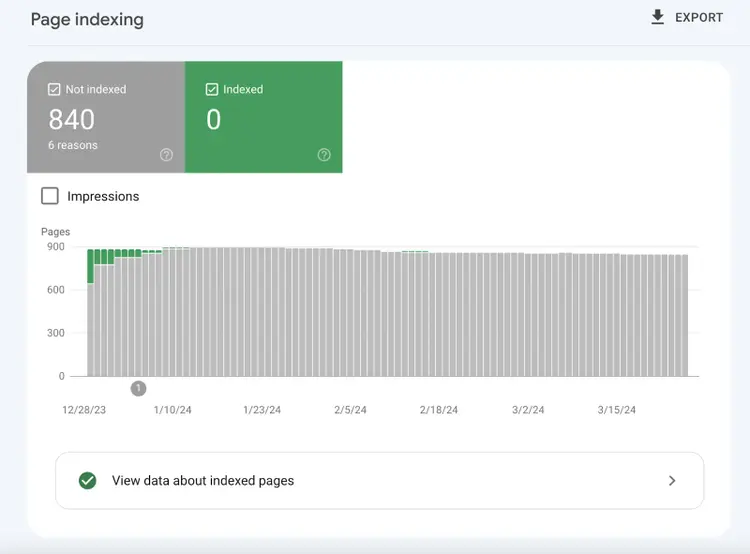
After some time (usually a few days), you should find that all your pages are “Not indexed,” which means that Googlebot can crawl the pages and the noindex tags work.
If any pages are missing or there are indexing errors unrelated to the noindex tags, there could be a problem that will affect your SEO post-migration.
Make sure to investigate and resolve these crawlability issues. You can then re-add password protection.
13. Update your DNS TTL value
Updating your DNS TTL value before migration ensures visitors can quickly find your site at its new IP address if you’re changing hosting providers.
TTL stands for "time to live." The TTL value tells computers when to check back for a potential change to your DNS record. Lowering your TTL value helps your new IP address spread across the internet faster, ensuring that other computers quickly re-locate your website after it moves and send visitors to the right location.
Just make sure the change is temporary, as low TTL values create unnecessary work for internet systems once your migration is complete.
Part 3: Map old URLs to new URLs
Mapping old URLs to new URLs helps you set up the necessary redirects (when browsers forward traffic to a set URL) so users and crawlers land on the right page.
Skip this section and go to part four if you aren’t updating your URLs.
14. Create a list of your current URLs
Create a list of your current URLs so you have an inventory of all the content on your site.
To compose the most accurate list and ensure you don’t miss anything important, compile data from multiple sources including:
SEO Audit: Export URLs that SemrushBot has crawled
GSC: Export URLs that Googlebot has crawled and indexed
GA4: Export URLs that users have visited
Backlink Checker: Discover pages on your site that have backlinks
XML sitemap: This is the file that contains the URLs you want to be indexed
Content management system (CMS) tools: Your CMS might have specific tools that let you generate a list of your site’s URLs
15. Plan which pages to redirect and which to delete
Now, your team needs to plan which pages to redirect and which ones to delete so you know what will happen with every page.
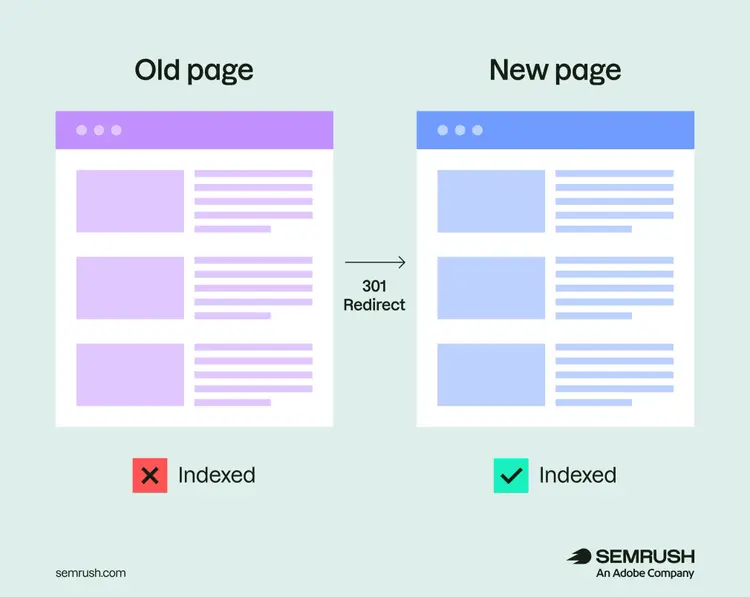
If the content is moving to a new location, you should add a server-side 301 redirect from the old URL to its new counterpart (e.g., from http://www.example.com/ to https://www.example.com/).
A 301 redirect ensures that visitors who use the old URL reach the new destination but also tells search engines that the resource has permanently moved — and that any existing SEO authority should transfer to the new URL.
Applying 301 redirects can also help preserve rankings and traffic.
You should not redirect content if there’s no equivalent URL for it on the new site. Say there are outdated blog posts you don’t want to transfer to your new site. You might think it’s a good idea to redirect these URLs to your new blog homepage. But this can cause confusion for users and is bad for SEO.
Instead, these old URLs should be set to serve a 410 status code (a code that tells search engines and users that the resource has been permanently removed).
In the end, you should have a URL map that looks something like this:
16. Update URLs on your staging site
Replacing old URLs on your staging site prevents broken links and unnecessary redirects that can slow your site and hurt SEO performance.
You’ll need to check URLs used in:
Href links: Standard, clickable hyperlinks. These will appear in your main navigation, footer, body content, etc.
The XML sitemap: The file that defines all the URLs you want search engines to index
Robots.txt: The file that defines URLs you want to block. It should also contain the URL for your XML sitemap
Canonical tags: Code used to specify the preferred version of a page. If the page has no duplicates, the canonical should be self-referencing
Hreflang tags: Code used to specify all the translated versions of a page. (Hreflang tags aren’t needed if you don’t serve your content in different languages.)
And any other key locations on your website.
17. Perform final checks on your staging site
Perform a final overview of your staging site to ensure everything looks good before you migrate.
Here’s a quick checklist:
Rerun the SEO Audit to look for any important issues
Check for any recommendations flagged in GSC
Review website functionality on desktop and mobile devices
Make sure there’s no placeholder content (e.g., lorem ipsum)
Ensure data is being captured in your analytics
Confirm that your site is legally compliant (e.g., check your privacy policy)
Part 4: Completing the migration
Completing the migration is when you transition from your old site to your new one.
Here’s everything you should do to ensure a smooth migration.
18. Record the current site status and create a content backup
Recording final site data and creating backups before migration provides your safety net for comparison and recovery if issues arise.
This is your last chance to collect baseline data for post-migration comparison — capture current Site Audit results, GA4 reports, and ranking data.
Back up all content including pages, meta tags, and site configuration. Use your hosting provider's control panel backup feature, or if you're using WordPress, try plugins like Duplicator or UpdraftPlus.
19. Evaluate the complexity and migrate in chunks
Migrating large sites in smaller chunks reduces risk and makes troubleshooting easier when issues arise.
So, if you have a large website, we recommend that you move content section by section (e.g., by content type), starting with the least important or smaller segments.
Don’t forget to perform tests after each move (like re-running a site audit) to check for any errors you should fix before migrating the next chunk.
20. Update the DNS settings
If you’re switching to a new server, you need to update your DNS record so it points to the new IP address.
To do this, contact your hosting company and request the change.
Make sure to revert your TTL value back to normal, too.
21. Remove all temporary website blocks
Removing temporary website blocks ensures your new website is available to users and search engine crawlers.
That means removing:
Password protection
Unnecessary noindex tags from your HTML
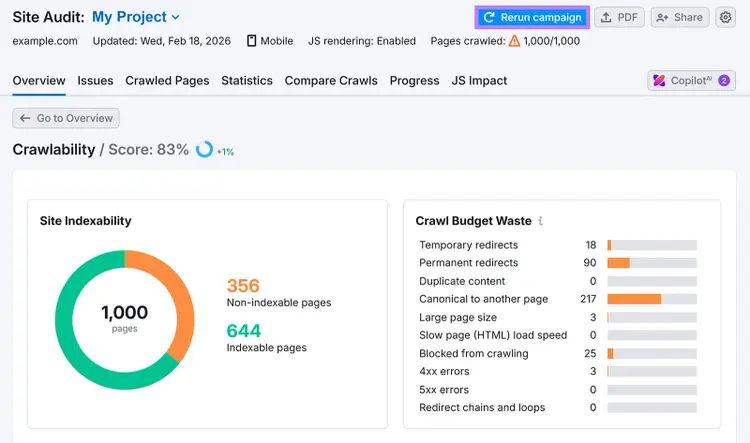
Afterward, re-run your Semrush Site Audit and check for issues in the “Crawlability” report.
Fix these issues so they don’t hurt your site’s SEO.
22. Enable redirects and removals
Enabling your planned redirects and removing unmigrated pages completes your URL transition and helps search engines understand your new site structure.
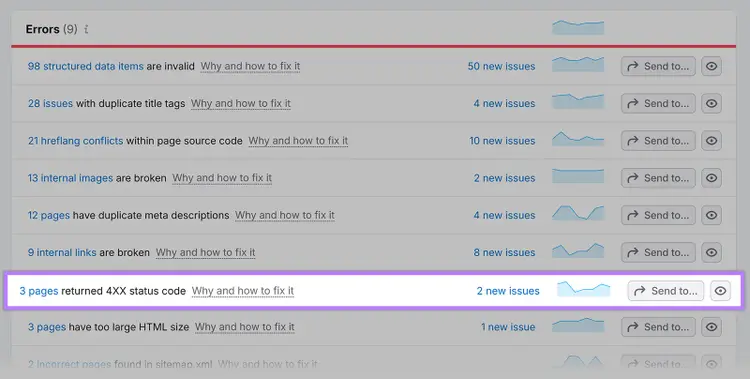
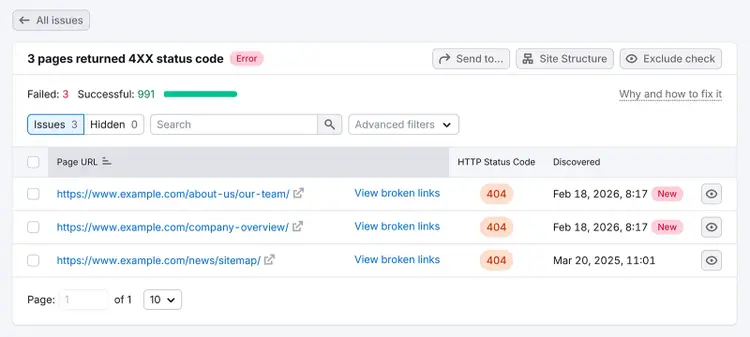
To check that everything’s working correctly, rerun your Site Audit campaign and go to “Issues.”
In the “Errors” section, you’ll see how many pages return a 4XX (e.g., 410) status code. The “Notices” section shows how many URLs have permanent redirects.
Click the “# pages” link to see all the corresponding URLs and check they’re correct.
23. Complete SEO-focused tasks in Google Search Console
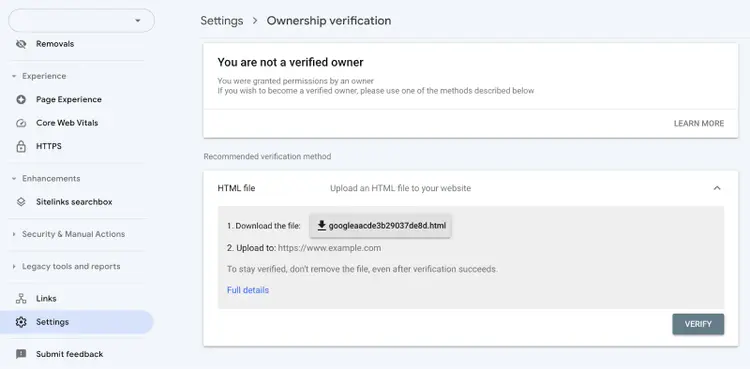
SEO-focused tasks in Google Search Console include verifying site ownership, submitting change of address forms, and updating sitemaps to help Google process your migration efficiently.
First, go to “Settings” > “Ownership verification” and check that you’re a verified owner on your new site. If not, you may need to upload the HTML file provided to your new website.
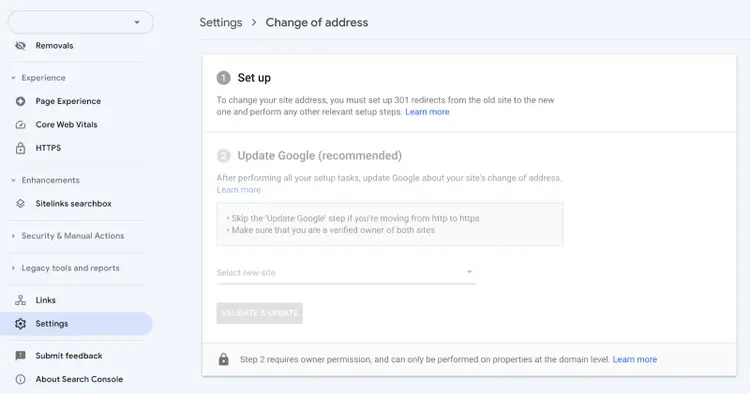
If you’ve moved to a new domain, go back to “Settings” and click “Change of address.”
Fill out the provided form to speed up indexing for your new pages and minimize your ranking losses.
Next, go to “Indexing” > “Sitemaps” and submit the XML sitemaps for your old site and your new site. Submitting both sitemaps helps Google discover the redirects from the old URLs to the new ones, and allows you to monitor the indexation/removal process.
24. Update external links
Where possible, you should update any external links (links to your site from other domains) that point to your old URLs, as it’s better that they don’t go to a deleted page or through a redirect.
Outdated links could be present in properties you own, such as:
Social media profiles (Twitter, LinkedIn, Facebook, Instagram)
Email signatures
Business listings (Google Business Profile, Yelp, industry directories)
Guest posts you've written for other sites
Press releases and media mentions
Digital advertising campaigns
For links controlled by other parties (known as backlinks), try reaching out and asking them to update the links. Here’s an email template you can use:
"Hi [Name], I noticed you link to our article at [old URL]. We recently migrated our site, and this content now lives at [new URL]. Would you mind updating the link? The redirect works fine, but a direct link would provide a better experience for your readers. Thanks!"
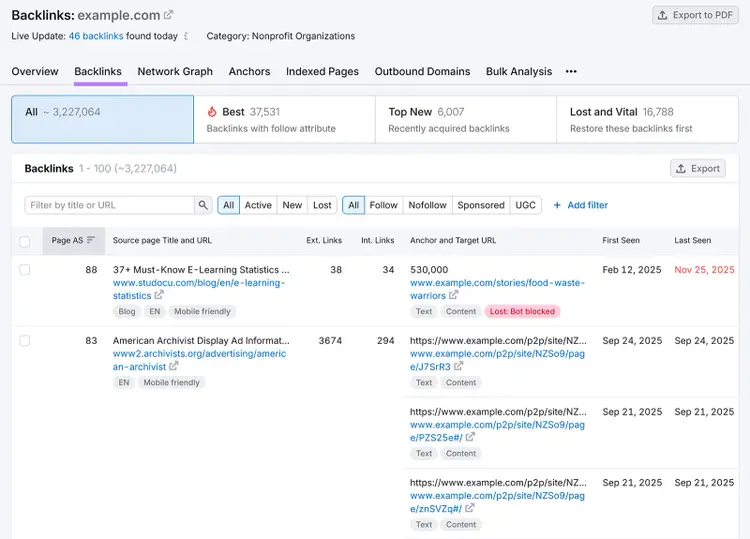
You can find backlinks to your old site using Semrush Backlinks tool.
Just enter your old domain then go to the “Backlinks” report.
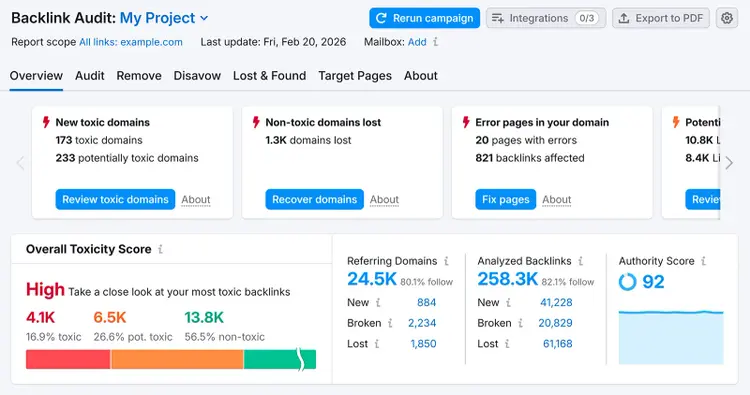
After that, set up the Backlink Audit tool for your new site so you can easily monitor incoming links.
Part 5: Post-migration monitoring
By monitoring performance after your migration, you can spot (and resolve) issues early so they don’t snowball into bigger problems and hurt your rankings.
Let’s continue the last part of our SEO site migration checklist:
25. Document the migration
Document your migration so you know what to expect for future migrations.
Create a post-migration report including:
What went well: Successful strategies and processes to repeat
What went wrong: Issues encountered and how they were resolved
Timeline accuracy: Did the project take longer than expected? Why?
Resource utilization: Did you have the right team and tools?
Final results: Traffic, rankings, and conversion rate changes
Lessons learned: Key takeaways for next time
Share this report with all stakeholders. It provides valuable insights for future projects.
Tip
Set calendar reminders to review migration performance at 30, 60, and 90 days post-launch. This ensures you don't forget to monitor long-term impacts.
26. Check for issues using analytics tools
Checking for issues with analytics tools ensures you don’t miss any critical errors that prevent search engines from crawling and indexing your site.
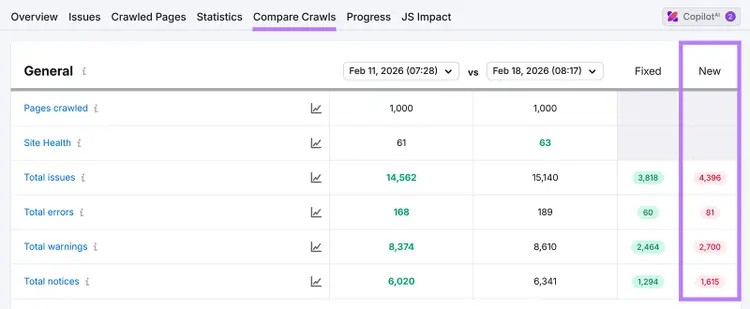
Start by rerunning your Site Audit campaign. Go to “Compare Crawls” to see if the number of issues has changed post-migration.
If there are any “New” issues, make sure to click through to investigate them.
Also keep an eye on the “Page indexing” report in GSC, which should show your new pages being indexed and your old pages being deindexed.
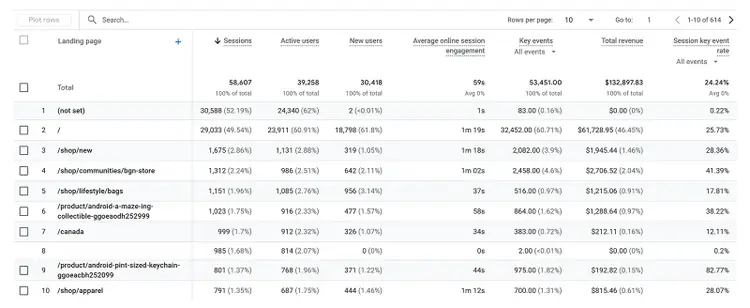
And use GA4 to track traffic and conversions, making sure to compare against your benchmarks from earlier.
Pay attention to pages that perform worse than others or worse than they did in the past, as there may be a specific issue to blame (like a broken call to action).
And the AI Visibility Toolkit has charts that let you track brand visibility over time, so you can see how your site performs in LLMs post-migration, too.
Tracking your keyword rankings helps you understand how your new site is performing in the search results and can alert you to any major ranking issues.
Semrush’s Position Tracking tool provides the detailed insights you need.
After importing the keywords you care about, select a date range spanning your website migration.
You’ll immediately see any changes to your overall visibility, which should recover within a couple of months. (If not, follow the steps in the troubleshooting section at the end of this article.)
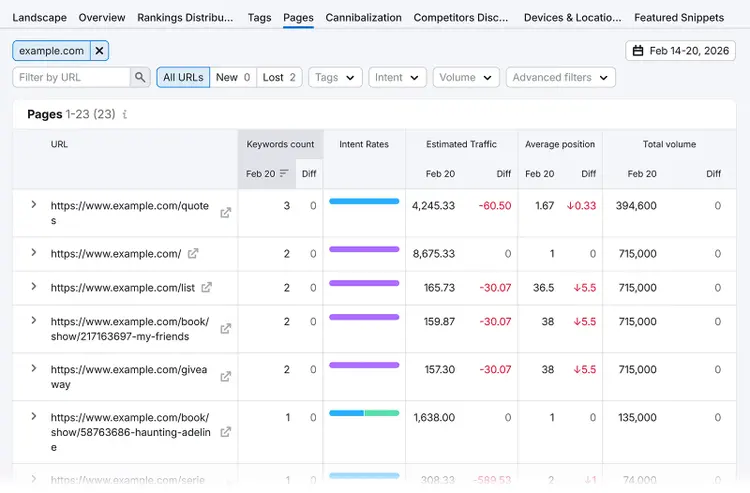
In the “Pages” report, you can track your performance by URL.
It’s normal to experience temporary drops in rankings after a site migration, but it’s worth investigating pages that are performing worse than expected.
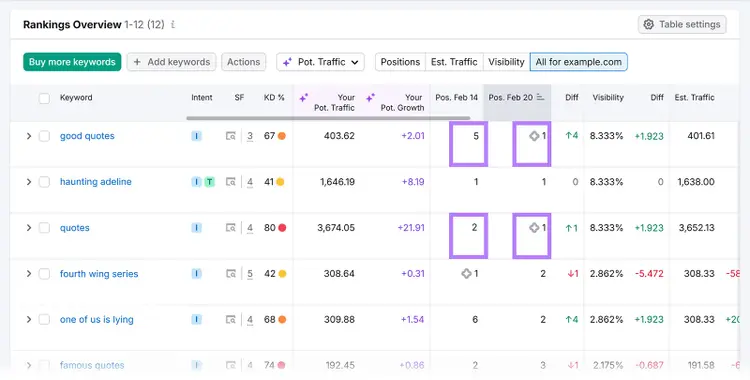
In the “Overview” report, you can monitor performance for individual keywords.
Look at the icons in the “Pos.” columns to see whether you’ve lost or gained any SERP features (elements that can help your result stand out on search results pages.)
28. Add a Semrush Note about your migration
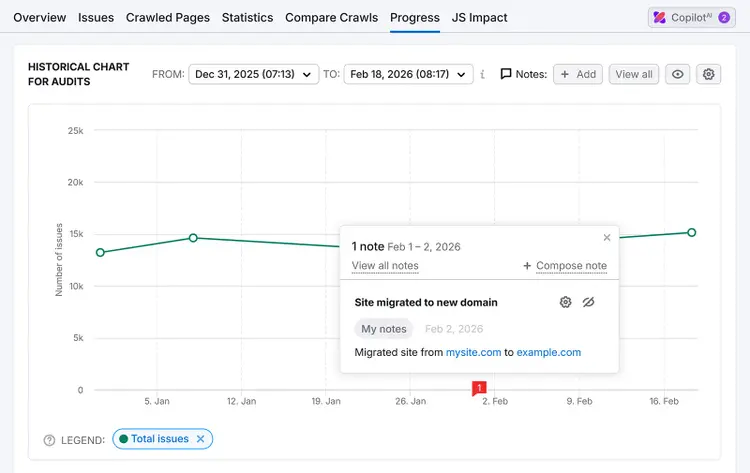
Make note of your site migration date in Semrush Notes so you and your team have context about fluctuations in rankings and traffic.
Your note can then appear in various graphs across the Semrush toolkit, making it easier to compare results before and after the move.
For example, this note in Site Audit makes it easy to see if the migration correlated with an increase in technical issues.
While this note in Position Tracking lets us see the migration’s effect on search visibility.
29. Cancel your old hosting
If you migrated to a new server/hosting provider, you can cancel your old hosting when Google finishes indexing your new website.
Troubleshooting your migration
Go over these tips to troubleshoot any issues that arise post-migration:
Find out if a particular source is driving the traffic loss (via GA4):
If you’ve lost traffic from backlinks or ads, check the redirects
Find out if you’ve lost traffic/rankings across your entire site or specific pages:
If the issue affects many pages across the website, re-run Site Audit to find out if technical issues are causing trouble — and follow the tool’s instructions to fix them
If you have specific pages that have lost positions, look at the backup and see if changes to content/meta tags could be responsible
You can also face problems even if your site doesn't have any technical errors. For example, diminishing performance for conversion rates, bounce rates, and exit rates could mean your audience is facing barriers in their journey that you need to investigate.
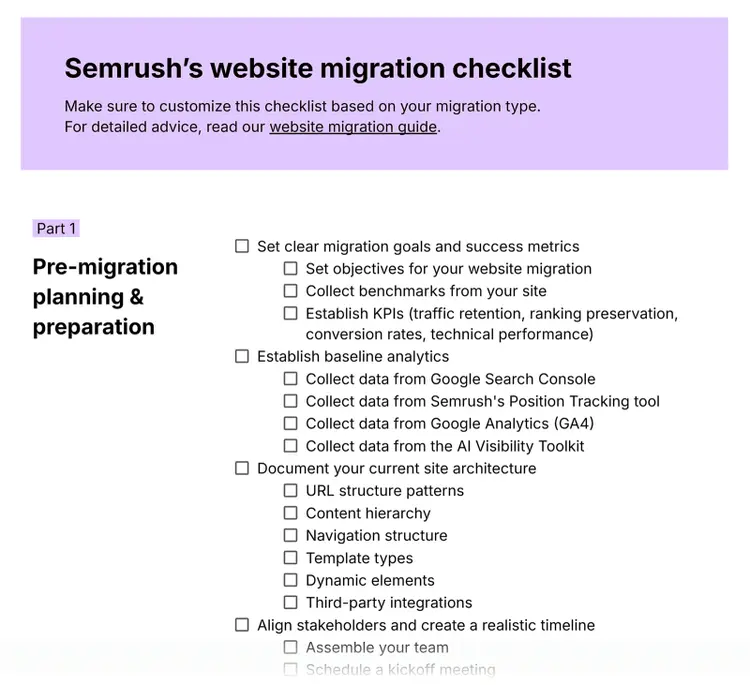
Get your own free website migration checklist
We’ve created a simplified, interactive version of this website migration checklist in Google Docs.
Carlos Silva leads the editorial pipeline for the English blog—coordinating writers, editors, strategy, and building AI workflows that boost content quality and AI visibility. With 10+ years of experience writing and editing across in-house and agency roles, Carlos blends content strategy, SEO, and AI to help marketers stay ahead of an evolving search landscape.
Subscribe to learn more about General SEO
Subscribe
By clicking “Subscribe” you agree to Semrush Privacy Policy and consent to Semrush using your contact data for newsletter purposes
Carlos Silva
Carlos Silva leads the editorial pipeline for the English blog and builds AI workflows that boost content quality and AI visibility. 10+ years writing and editing across in-house and agency roles.
Share
Tells Google to show you more from Semrush in AI, Search, and Discover.