
What Is Split Testing?
Split testing (also called A/B testing) compares two versions of digital content—like webpages, emails, or ads—to see which version performs best.
In a split test, you create two versions of your content:
Version A is your original (known as the "control") and is shown to one portion of your audience.
Version B is the "variant" with one or more changes (new messaging, colors, or button placements) and is also shown to another portion of your audience.
The version that improves the content marketing metric you’re focused on (conversions, engagement rate, etc.) becomes the winner.
For example, you can test two product landing pages by creating a variation that includes a testimonial or review ratings directly next to your primary call to action (CTA)
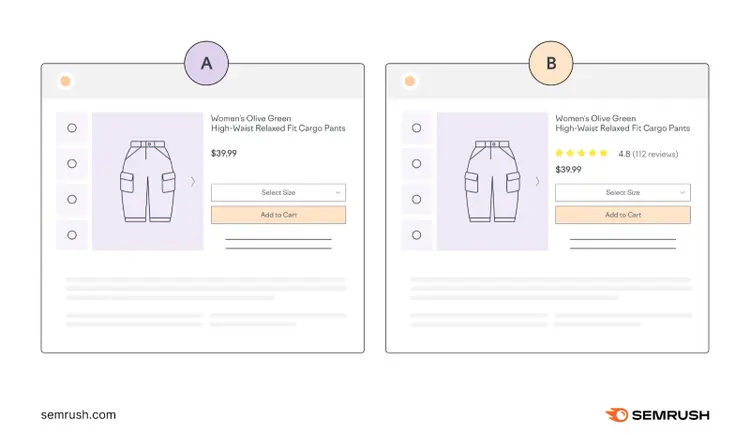
The winner can then become your go-to version.
What Are the Benefits of Split Testing?
Here’s how split testing can directly benefit your business:
- Drives better results: Running A/B tests gives you concrete data on what leads to better performance. And you can apply what you learn to future content.
- Guides decisions with real data: Testing small changes first allows you to make informed choices, minimizing the risk of losing customers or conversions if a change doesn’t deliver.
- Reveals high-impact changes: Testing one element at a time pinpoints which changes drive the biggest results, so you know exactly where to focus for maximum impact
How to Conduct a Split Test
A split test might seem tricky at first, but you can set one up quickly by following these steps:
1. Identify What to Improve
Before you start testing, figure out what content you want to focus on and what you’re looking to improve.
Here are some examples of what you may want to improve based on the content type:
- Emails: Test subject lines, preview text, and CTA placement to see what effect those changes have on open rate, click-through rate (CTR), or conversions
- Ads: Try different headlines, visuals, and CTAs to identify which combinations generate higher engagement and click-through rates
- Organic social media posts: Experiment with post formats (e.g., carousels vs. single images), messaging tones, or hashtags to increase likes, shares, and comments
- Landing pages: Experiment with different layouts, messaging, or visuals to discover which design keeps visitors engaged and increases conversions.
- Other website pages: Test variations in headline phrasing, content structure, or image placement on these key pages to discover what encourages users to explore further
Now, let’s go over some ways you can identify exactly what it is you want to improve (this isn’t an exhaustive list—it depends on the content type):
Use Google Analytics 4
Google Analytics 4 (GA4) is a free tool that tracks website traffic and user behavior, so it can help you discover which pages perform well and which need improvement.
To find good webpage candidates for split testing, head to “Reports” > “Life cycle” > “Engagement” > “Pages and screens.”
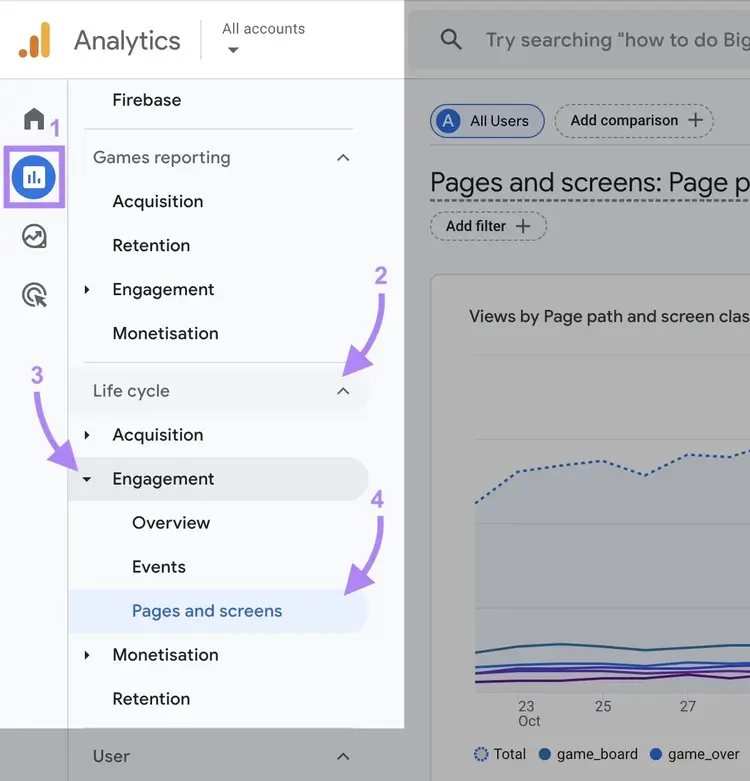
You’ll see a table showing data like:
- Views: The number of visits to a page
- Active users: Users who have engaged meaningfully with your site or app, by staying on the page for over 10 seconds, by viewing at least one more page, or by completing key events (conversions)
- Views per active user: The average number of times each active user viewed this specific page
- Average engagement time per active user: The average time an active user spends engaging with the content, indicating how informative or compelling the page is
- Key events: Important actions like clicks and purchases (Make sure you’ve set up conversion tracking to accurately measure this.)
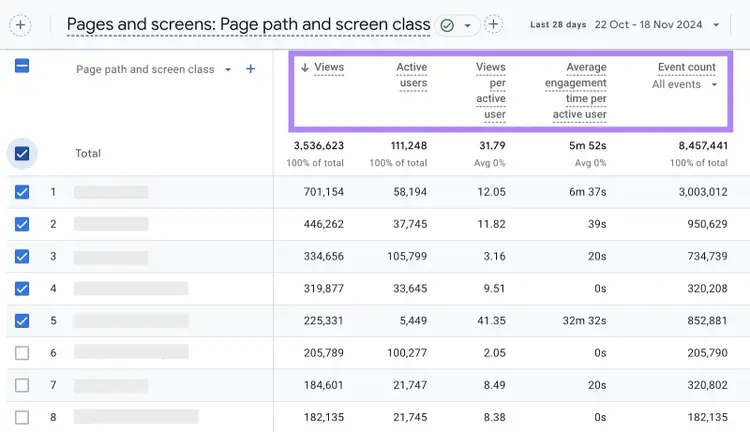
What can you do with the data?
Focus first on identifying pages with a high number of views but with low engagement or conversion rates. Because this suggests elements like content, page layout, or CTAs could be improved.
Experiment with split testing on these pages to find what better engages visitors and encourages them to take action.
Gather Feedback
Gathering audience feedback is crucial for pinpointing areas of confusion or friction in your content that you can address through testing.
Here are a few ways to gather feedback:
- Post-purchase surveys: After a user completes a purchase, include a brief survey on the confirmation page asking if anything was unclear or frustrating during the buying process
- On-site polls: Ask visitors who abandon their carts or are leaving key pages about what prevented them from completing the action using an exit-intent pop-up
- Email feedback: Include a simple feedback request in your newsletter that asks readers what topics or features they’d like to see more of in the future
- Social media polls: Use your social channels to poll your audience on what they find most valuable to help you fine-tune your content to their preferences
Depending on your method and the content it focuses on, consider whether broad or specific feedback will be more useful.
Broad feedback (like open-ended survey questions) can uncover unexpected insights that guide your strategy.
Alternatively, focused questions—such as a social media poll asking your audience to choose between four color options—can help you make quick and specific adjustments to your content.
Use Google Ads or Meta Ads Manager to Find Low-Performing Campaigns
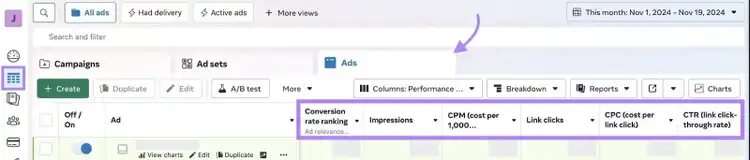
Review your ad-related data in Google Ads or Meta Ads Manager to identify ads with high impressions (the number of times your ad was shown) but low CTRs or conversions.
This can indicate that your copy, visuals, or CTAs may need adjustment. Once you identify what you want to adjust, run split tests to find the most effective changes.
You can find metrics you want to improve (like impressions, CTR, and conversion rate) in Google Ads.
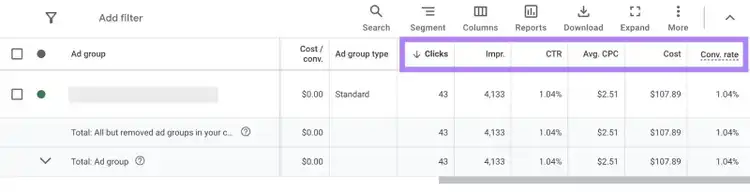
Similar metrics can be found in your Meta Ads Manager account.
2. Form a Hypothesis
Once you identify what needs improvement, it’s time to form a hypothesis on how you can boost your results based on what you already know about your audience and the content they do like.
(You might want to revisit the tools in the last section to make certain you know which pieces perform well and what tactics they use.)
For example, imagine you found a product page with a high traffic volume but few conversions. And after analyzing high-performing product pages, you notice they include more customer testimonials.
You could hypothesize that adding testimonials to the low-performing page will increase conversions.
Do this for all the content types you want to improve and all the elements you could test.
Then, prioritize your hypotheses using an impact matrix with four quadrants:
- Quick wins: High potential to drive impactful results with low effort
- Big bets: High potential to drive impactful results with high effort
- Fill-ins: Low potential to drive impactful results with low effort
- Thankless tasks: Low potential to drive impactful results with high effort
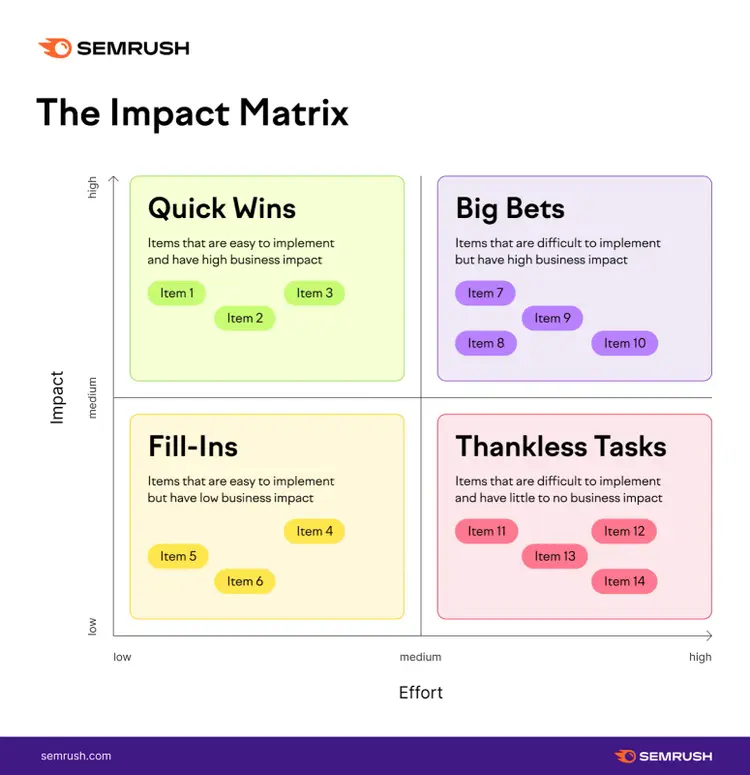
Choose what you want to test first based on this data and your available resources.
3. Run the Test
Once you’ve formed a hypothesis and selected something to test, it's time to create your variations and run the experiment.
Here are some tools to help do this for different content types:
- GA4 with a third-party integration: Combine GA4 with a third-party tool to test webpage performance and view detailed results within GA4’s reporting. This allows you to analyze user interactions with each test variant and make data-driven decisions.
- Google Ads: For paid ads, Google Ads offers built-in tools to test ad copy, images, and CTA buttons. Playing around with these elements lets you optimize for metrics like CTR, impressions, and conversions.
- Meta Business Suite: Run variations on content and visuals to test organic social posts across Facebook and Instagram. Meta Business Suite lets you track engagement, reach, and interactions to determine which posts resonate the most with your audience.
- Mailchimp: Mailchimp’s A/B testing features enable you to test subject lines, content, and CTA placement for email campaigns. So, it can help you discover what drives the most opens and clicks.
- Landing Page Builder: The Landing Page Builder app is ideal for creating and split-testing landing pages without coding knowledge. You can test variations of page layouts, headlines, and CTAs to find the best-performing design.
To get started with Landing Page Builder, use the tools in the left- and right-hand menus to customize your landing page.
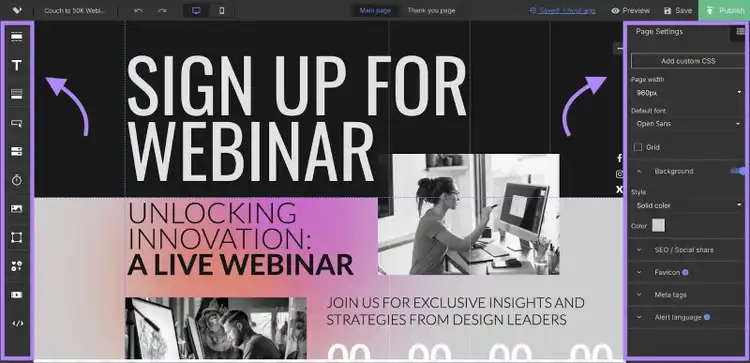
When you’re satisfied with the design, click “Publish” to make it live.
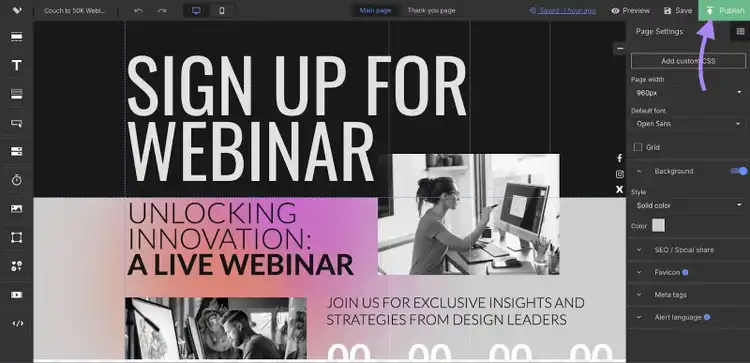
You can then change the URL of the provided link, publish the page to WordPress, or embed the page on your server.
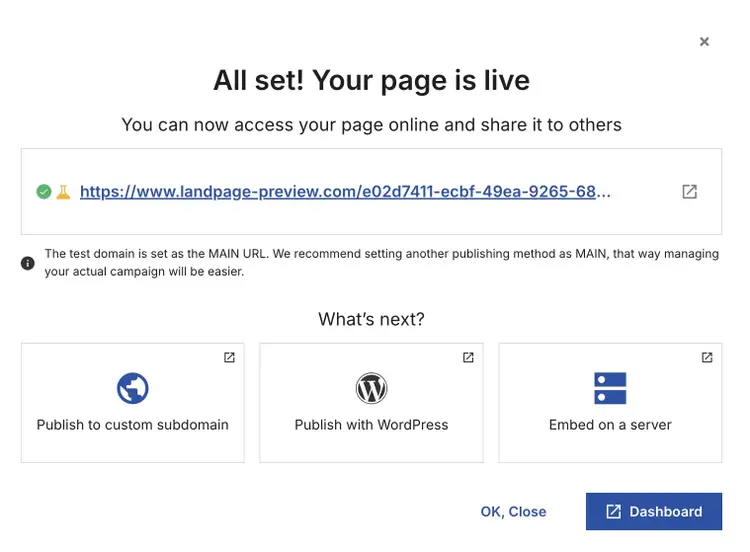
Once your main landing page is live, follow these steps to set up a test:
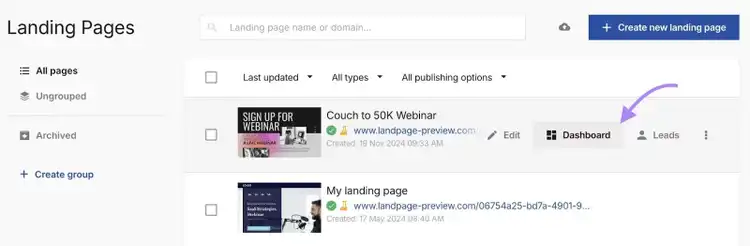
Go to the app’s main page and hover over your new landing page in the menu to reveal options. Click on the “Dashboard” button.
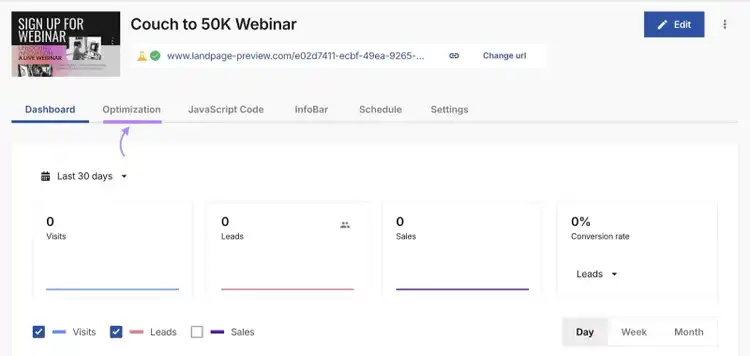
Next, click the “Optimization” tab.
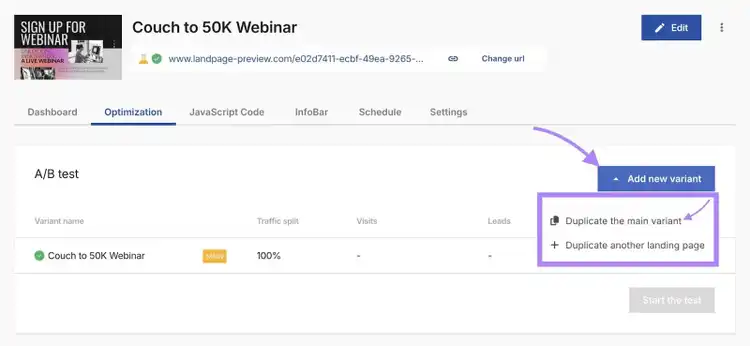
Click the blue “Add new variant” button to open the drop-down menu. Choose “Duplicate the main variant” to create an alternate version of your page.
Make changes to the new variant—adjust the headline, images, CTAs, or other elements you want to test.
Further reading: Landing Page Optimization: Best Practices & Tips
Start Split-Testing Landing Pages
with the Landing Page Builder App
4. Measure and Analyze the Split Test Results
Review the results provided by your split testing tool to determine which version performed better.
Look at the specific metrics you initially set out to improve to understand the impact of each variation.
But tools won’t analyze the results for you—you’ll need to do this yourself.
Here’s how to approach it:
- Review your key metrics: Compare the control and variant based on the metrics you aimed to improve, such as conversions, click-through rates, or bounce rates
- Check for statistical significance (if available): Many testing tools will indicate if the difference in performance is likely due to the changes you made rather than random chance. This can help you determine if your results are meaningful.
- Draw conclusions: If one version is a clear winner, implement it. If the results are unclear or there’s no winner, revisit your hypothesis and test a different element
You can also use insights from your test to inform other campaigns and content.
For example, if a particular design or messaging approach performed better, consider using it in other ads, landing pages, or email campaigns.
Even if your test didn’t deliver a clear winner, you may have identified valuable trends or audience preferences that can guide future experiments.
Split Test Best Practices
Here are essential tips to ensure your tests are reliable and actionable:
Testing One Element at a Time
Testing just one variable helps you more accurately measure what impacts results—testing multiple elements makes it impossible to know what made a difference.
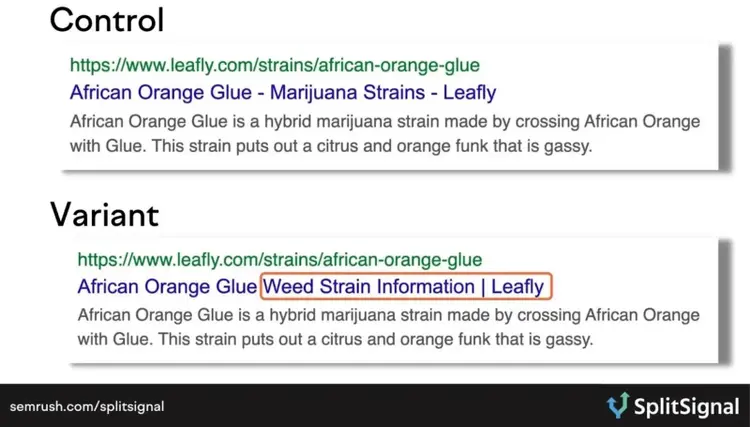
For example, Leafly used Semrush’s SplitSignal tool to test the impact of changing "marijuana" to "weed" in the titles of 500 product pages.
The result?
During a 21-day test, clicks increased by 2.7%. After rolling out the change across the site, Leafly saw an overall 0.5% lift in CTR and gained an additional 418,000 Google clicks.
This single-word change helped them better match what users were looking for when they searched on Google (known as search intent—the reason behind a user's search).
Choosing the Right Metrics
Select metrics that align directly with your business goals and the type of content you’re testing to ensure your split tests drive meaningful results.
Here are a few key metrics to consider, depending on your goals and content type:
- Conversion rate: Are visitors completing actions (e.g., sign-ups, purchases)?
- CTR: Are more people clicking your ads or on your webpages in search results?
- Engagement rate: Is your content resonating with your audience?
- Reach and impressions: Is your content reaching your intended audience? And how widely is it being viewed?
- Time on page: Are visitors spending enough time with your website content?
- Revenue/order value: Are your changes leading to increased sales or higher-value orders?
By selecting metrics that reflect your business goals and align with each content type, you can measure success more accurately and draw actionable insights from your split tests.
Ending Your Test Too Early
Ending a test shortly after launching is tempting when early results seem to confirm your hypothesis, but stopping too soon doesn’t account for factors that can skew your results.
Some of those factors include:
- Time of day, week, month, or year
- Website visitors from different sources (search engines, email newsletters, or social media)
- Changes in mood or circumstance (tests at the start of the month might be picking up consumers who’ve just been paid)
That’s why running your test until you reach statistical significance is ideal. Because it ensures the results are meaningful and not fluke.
The industry standard for statistical significance is 95%.
If your confidence level is 95% or higher, you can pretty accurately say that your change likely caused the difference in performance.
But not all tests will reach statistical significance, especially with smaller sample sizes or subtle changes.
If results are inconclusive, try testing a different element, increasing your sample size, or refining your test parameters for clearer insights.
For example, if you tested new CTA copy but didn’t see a significant change, consider testing the placement or color of the CTA instead.
Or, if you ran the test on a small audience segment, try expanding the sample size to capture more data.
Keeping Your Target Audience in Mind
Design your experiments with your target audience in mind to ensure your test variations reflect their preferences and needs.
Let’s say your audience is a bit older and more conservative.
While using casual language and animated GIFs in an email or on a landing page might capture the attention of younger audiences, it could come across as unprofessional or distracting to your audience.
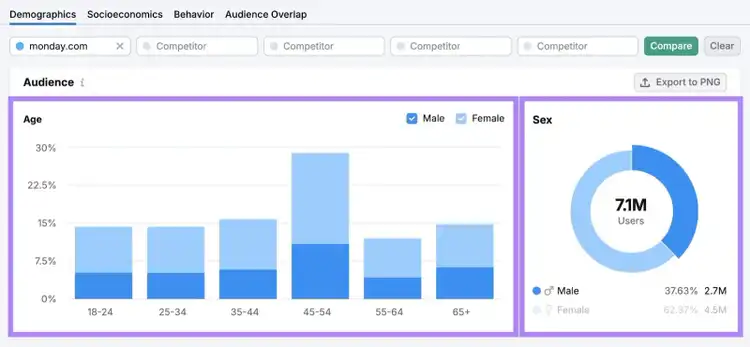
If you need to better understand your audience—their demographics, socioeconomic factors, and online behaviors—try One2Target.
For example, the “Demographics” report breaks your audience by age, gender, location, and more to give you insights that allow you to tailor your tests.
Drive Better Results Through Data-Backed Testing
Split testing eliminates the guesswork of optimizing your content by providing clear, actionable insights.
With tools like Landing Page Builder, you can speed up the process and view results to make informed decisions that improve performance.
Try it today.
Start Split-Testing Landing Pages
with the Landing Page Builder App

Sean is the SEO Content Manager at Scoro, a work management platform that helps agencies streamline projects, finances, and resources. Previously, he served as Content Marketing Manager at Toggl and worked at a digital marketing agency providing SEO services for local, national, and international clients. Sean also works as an SEO consultant, helping B2B SaaS companies increase their revenue by turning clicks into cash.

Tells Google to show you more from Semrush in AI, Search, and Discover.